Weapons Factory
Crackdown 2 Walkthrough and Guide
Weapons Factory
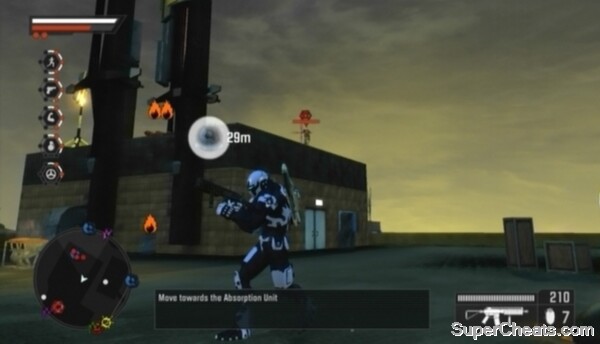
Absorption Unit 1
The first unit tied to the Weapons Factory Beacon is in the northeast quarter of southern Hope Springs. Make your way to the blinking Absorption Unit icon on your tracker in the bottom-left corner of the screen to locate the first unit in the network.
This unit is on the rooftop of the industrial building with a “Hi-Power” sign above its main entrance. To reach the top of this building, start by jumping onto the bus shelter next to the southern entrance and then from there jump to the pipes attached to the southern side of the building. Once on top of the pipes, jump over the railing and head through the alley to the east. You can ascend to the roof from here using the black, protruding structures along the west side of the building.
 Absorption Unit 1 |
Because you are near a Tactical Location, there will be many Cell soldiers on the roof of this building. Take the time to clear them out before activating the Absorption Unit. The rooftop is littered with explosive objects, so use these to your advantage. You can secure the Tactical Location here afterward if you are so inclined.
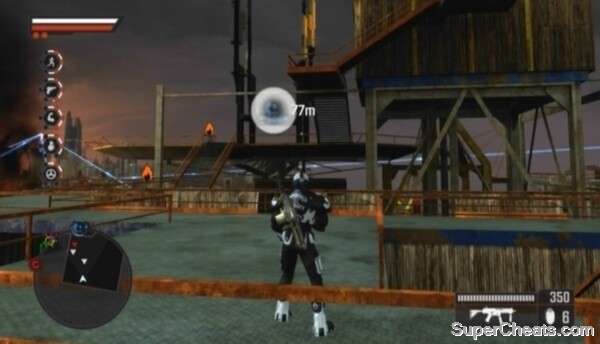
Absorption Unit 2
This next unit is a bit of a pain to get to. It's on the south-most rig in the water southeast of southern Hope Springs. You'll have to cross the first two rigs to get to the third where the Absorption Unit is. Each rig is rife with Cell soldiers, so make sure your Agent is equipped with an Assault Rifle, Shotgun and Grenades. You can switch your Agent's weapons at an Agency Landing Zone or by selecting the “Extraction” option in the System section of the Intel Screen and redeploying him.
To get to the first rig, you can either swim out to it or cross the large piping attached to it. It's best to swim to it, since you'll no doubt have Cell soldiers firing at you if you attempt to cross the pipe.
Fight your way to the other end of the first rig and jump to the suspended stairs attached to the second. The second rig is crawling with Cell soldiers. Since you'll be fighting in close quarters, it's best to go at these guys with your Shotgun
Keep an eye on your tracker as you move toward the south end of the rig. White blips denote enemies that are not yet aware of your presence, while red blips denote enemies who are on to you. Further, triangular blips on the tracker denote enemies who are either above or below you, depending on which way the tip of the blip is pointing.
 Absorption Unit 2 |
When a group of enemies becomes aware of your presence (usually when one of them fires a flare), they often cluster together when trying to reach you. This is where grenades are especially useful. The dumb-as-rocks AI very rarely scatters when a grenade is thrown, so you can often score multiple kills with a single, well-thrown grenade.
Fight your way to the top level of the second rig. The stairs at the south end of the top level lead to the third rig. Mind the gap.
There are many Cell soldiers in the area surrounding the Absorption Unit. Since you're more in the open now, equip your Assault Rifle and start picking off enemy soldiers from afar. If your Agent's health is low, fallback down the stairs and remain there until his health is restored before heading back up to continue the fight. As per usual, there are plenty of explosive materials dotting the area, so use these to your advantage if there are enemies nearby them.
When the area is clear, head for the Absorption Unit on the platform in the northwest corner of the rig. Eliminate any remaining enemies nearby and then stand on one of the platforms until you've activated the unit.
Absorption Unit 3
The final unit is on the east-most bridge between northern and southern Hope Springs. It's on top of the platform midway down the bridge. There is a group of Cell soldiers surrounding the unit; they'll fire down at you as you approach, so quickly make your way to the series of red ridges leading up to the middle of the platform and start climbing.
 Absorption Unit 3 |
Once on the platform, use your Assault Rifle and Grenades to take down the enemy soldiers there and then get to activating the unit.
Weapons Factory Beacon
Before getting started, ensure your Agent is equipped with an Assault Rifle, Machine Gun (go with a UV Shotgun if you don't yet have this weapon unlocked) and UV Grenades. You can switch your Agent's weapons at an Agency Landing Zone or by selecting the “Extraction” option in the System section of the Intel Screen and redeploying him.
The Beacon deployment area is inside the weapons factory on the island east of southern Hope Springs. Cross the ruined bridge over to the island and make your way to the weapons factory at the north end. To get inside the factory, you must climb the rocks surrounding the tower to get to the opening at the top of the tower. The rocks on the east side of the tower are the easiest to climb.
Once you've made it up to the tower, ascend to the top using the grooves around the tower. Use the platforms all along the walls of the inside of the tower to descend to the Freak Lair without suffering fall damage. When you've made it to the bottom, stand in the marker and call the helicopter to get started.
There are two different types of attacking Freaks in this lair: the projectile-throwing Freaks you encountered in the Power Station lair and a new, exploding type. These new Freaks will attempt to run at the charging Beacon and explode to damage it. These explosions deal modest damage and just one bullet is enough to detonate these exploding Freaks, so there's not much to worry about.
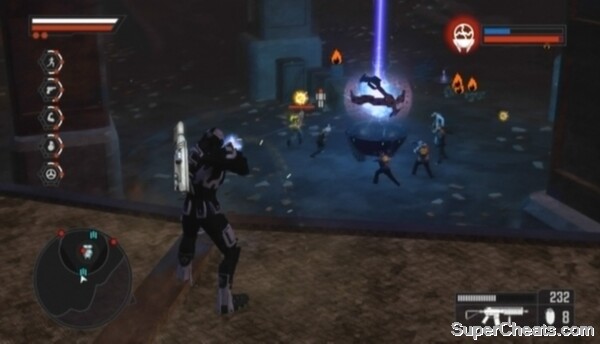 Stand on the circular walkway while defending the Beacon. |
The best way to go about defending this Beacon is to remain on the circular walkway that's suspended above the bottom floor and take down attacking Freaks from there. The exploding Freaks will enter the lair from the entry points on the bottom floor and the projectile-throwing freaks from the entry points along the side of the circular walkway.
Not only does remaining on the circular walkway protect you from the garden variety Freaks below, but it also puts you in a good position to take down both types of attacking Freaks with your Assault Rifle.
Keep an eye on your tracker for red, upside down triangles, as these will denote exploding Freaks below you if you're standing on the walkway. You just need to hit these Freaks with one bullet to detonate them, so get on that as soon as they enter the area and then get back to clearing any projectile-throwing Freaks on the walkway.
Continue sprinting around the circular walkway, gunning down any projectile-throwing Freaks that appear on the walkway and any exploding Freaks that appear below, until the blue meter in the top-right corner of the screen is completely full and the Beacon detonates.
Defending the Weapons Factory Beacon
More Crackdown 2 stuff on SuperCheats
No comments yet. Tell us what you think to be the first.