2-1: Storage Facility
Resident Evil 5 Walkthrough and Guide
Resident Evil 5 Guide - Walkthrough
Chapter 2-1: Storage Facility
| ______|¯¯¯¯¯¯¯¯¯¯¯¯¯¯¯¯¯¯¯¯¯¯¯¯¯¯¯¯¯¯¯¯¯¯¯¯¯¯¯¯¯¯¯¯¯¯¯¯¯¯¯¯¯¯¯¯¯¯¯¯¯¯¯¯¯¯¯¯¯¯|
|| ____/|            [C2-1] Chapter 2-1: Storage Facility                      |
|| |__  |______________________________________________________________________|
||___ \ |¯¯¯¯¯¯¯¯¯¯¯¯¯¯¯¯¯¯¯¯¯¯¯¯¯¯¯¯¯¯¯¯¯¯¯¯¯¯¯¯¯¯¯¯¯¯¯¯¯¯¯¯¯¯¯¯¯¯¯¯¯¯¯¯¯¯¯¯¯¯|
| ___) ||A ferocious B.O.W. has been encountered by Chris and Sheva.  In order |
||____/ |to continue, they must traverse the docks area.                       |
|-------|----------------------------------------------------------------------|
|ITEMS  |[] H&K MP5, [] Barrel x3, [] Crate x2, [] Barrel, [] Crate,           |
|       |[] Barrel x2, [] Barrel, [] Barrel x2, Crate x2, [] Barrel, [] Crate, |
|       |[] Barrel, [] Crate x2, [] Sapphire (Pear), [] Green Herb, [] Barrel, |
|       |[] Crate, [] Green Herb, [] Gold (100), [] Topaz (Pear), [] Fruit x2, |
|       |[] Ruby (Marquise), [] Emerald (Square), [] Tomatoes, [] Port Key,    |
|       |[] Barrel, [] Barrel x2, [] Gold (Large), [] Crate, [] Green Herb,    |
|       |[] Green Herb, [] Rifle Ammo, [] Barrel.                              |
|-------|----------------------------------------------------------------------|
|EMBLEMS|5x. (4 on this page, see Shanty Town page for the other               |
|-------|----------------------------------------------------------------------|
|ENEMIES|1. Majini (Town).                                                     |
|       |2. Kipepeo.                                                           |
|       |3. Adjule.                                                            |
|       |4. Big man Majini.                                                    |
|       |5. Chainsaw Majini [Semi-Boss].                                       |
|       |                                                                      |
 ¯¯¯¯¯¯¯¯¯¯¯¯¯¯¯¯¯¯¯¯¯¯¯¯¯¯¯¯¯¯¯¯¯¯¯¯¯¯¯¯¯¯¯¯¯¯¯¯¯¯¯¯¯¯¯¯¯¯¯¯¯¯¯¯¯¯¯¯¯¯¯¯¯¯¯¯¯¯
The suitcase contains a [H&K MP5] machine gun that you migth want to grab. Besides that, there are three [WOODEN BARRELS] and two [WOODEN CRATES] in the hall. Two documents can be read, one about the inventory, the other about directions for your partner. Above the latter, shoot the shiny turquase [BSAA EMBLEM] on the wall and exit the area.
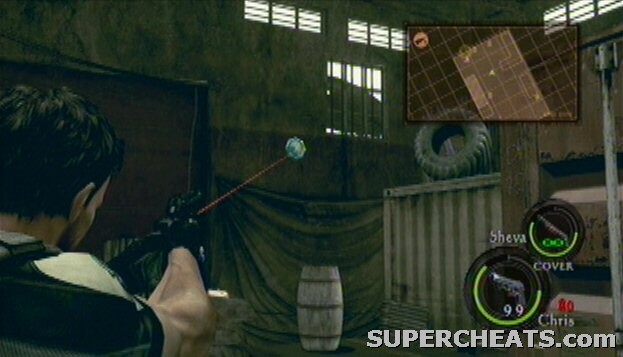 BSAA Emblem |
You're now at the docks. Make your way through the container area but be very careful around the tripwire with an explosive attached to it. Shoot it from a distance to blow it up. Proceed and kill a few Majini's. The SE container holds a [WOODEN BARREL] and the NW region houses a [WOODEN CRATE] and two [WOODEN BARRELS], but you can't just walk up to them due to an explosive trap that's blocking the way. Instead, climb the ladder of the container (the ladder is on the other side) and drop down. You can now disarm the trap by shooting it down.
As you proceed northeast you'll encounter Adjule's, in other words mutated dogs. They are among the fastest enemies in the game, so stick together and use your shotgun to get rid of them. The Majini's are easily taken care of. Look to the north for a [WOODEN BARREL] placed out of sight. Shoot the explosive trap and proceed southeast. Another Majini attacks you, so lay him to rest. Climb and move over the containers up ahead, drop down and you'll reach an area with a group of nasty Majini's, including a stronger Big man Majini. His punches can be dodged fairly easily and he'll drop a Jewel Bangle as treasure.
Having trouble with the docks? This video shows how to handle obese Majini's, mutated dogs and drunken truck drivers, along with much more.
The area also contains two [WOODEN BARRELS]. With the enemies gone, head over to the slidable gate to the east and combine powers with your partner to open it. Two [WOODEN CRATES] are nearby, so get their contents before hopping over the gap at the bridge.
When you're crossing the bridge, a truck will appear and try to run you over. Either shoot the driver or aim for the explosive barrels. When it flips over, many more Majini's will make their appearance. Use the barrels to wipe out entire groups at once, which saves considerable amounts of ammunition. In the room up ahead you can find a [WOODEN BARREL] and a [WOODEN CRATE]. I also found Handgun Bullets here, but they may or may not be from an enemy, can anyone confirm this?
Another [WOODEN BARREL] can be found before you head downstairs. When you've made your way down, turn around and check the middle bridge support of the large bridge to spot a [BSAA EMBLEM]. Equip your shotgun and enter the sewer tunnel. Shortly after you enter a few Adjule assault you, and you'll encounter several more as you continue. When you get to the maintenance room, loot the contents of the two [WOODEN CRATES] and open exit the area.
 BSAA Emblem |
Tip
Back in the open air, check your left for a shiny object that turns out to be a [SAPPHIRE (PEAR)]. As you approach the seemingly dead Majini's, several Kipepeo will mutate from their bodies. These flying parasites aren't very strong, but they can occasionally dodge bullets and they're fairly fast. When they're dead, remove the lock from the door and go up the ladder at the end of the tunnel.
Back outside, grab the [GREEN HERB] nearby the canoe and go inside the house to your right (east). There's a [WOODEN BARREL], [WOODEN CRATE] and a [GREEN HERB] in here. Head to the beach and walk into the sea. You can find [GOLD (100)] in the left (south) region, and a [TOPAZ (PEAR)] can be found in the upper right (northwest) corner near the boat.
From the locked gate, check the small green hut nearby and look under the roof to spot a quite well hidden [BSAA EMBLEM].
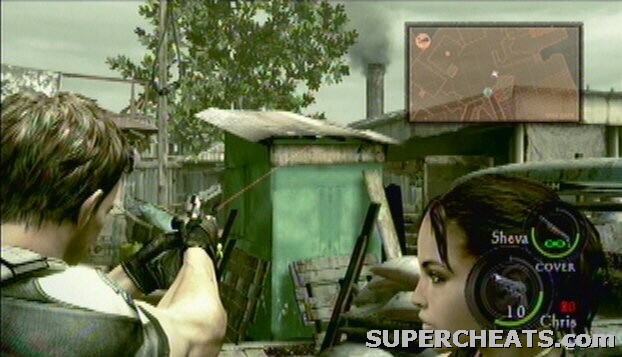 BSAA Emblem |
Go to the center of the area and slash the [FRUIT x2] for items, usually also a Hand Grenade. That's a good thing, because if you toss that grenade in the center or nearby the stand, it'll fall apart, allowing you to not only grab two random items but also treasure from the chest: [RUBY (MARQUISE)]. There's one other thing to do. Head southeast and climb the ladder so you can walk over the roof of the building. The north corner contains an [EMERALD (SQUARE)].
Drop down and enter the building through the green double doors. Slash the [TOMATOES] for an item, then shoot the [PORT KEY] from the body and take it. All hell breaks loose and you'll face several Majini and a Big man Majini. It's up to you to choose between fight or flight, but you'll have to go to the dock either way in order to continue. Use the Port Key to unlock the door and head for the ship.
The nose of the ship contains one [WOODEN BARREL], the rear contains two [WOODEN BARRELS]. Move over the dock and jump in the water again. Search the side near the ship to find [GOLD (LARGE)]. Go back ashore and Kirk will arrive with the chopper to lend a hand from above. His support consists of several useful rockets at groups of Majini's. When he has done that, head in for the rest, usually bowmen on the roofs.
The northwest building contains a [WOODEN CRATE], and you can find a [GREEN HERB] on top of the eastern building with bowmen. At this very spot where the herb lies you can also look to the northeast and see a [BSAA EMBLEM] inside the building in front of you. Shoot it and drop back down.
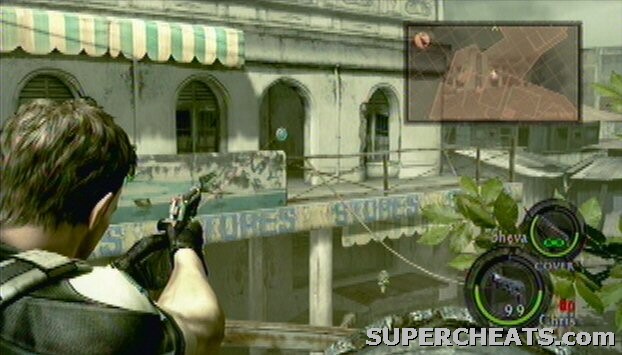 BSAA Emblem |
Up ahead, locate a [GREEN HERB] on a table nearby the roadsign. More Majini rush out of a building and they all want to party with you. Let's. When you're done dancing, search the area for [RIFLE AMMO] and a [WOODEN BARREL] in the southeastern alley. The eastern building houses the [S75] rifle and another [WOODEN BARREL]. It's quite a small room, isn't it? I wonder what all those Majini were doing in here.. and I don't even want to know. Exit the stage by the red double doors and you might find yourself in a whole lot more comfortable stage called .. Shanty Town!
[b][/b] 2-1
What about the treasure chest? You climb the ladder up the crate on the east side, then jump across. There's a chest there.
No you get a ultimate retard badge for not looking at the next page.
There are 2 pages to chapter 2-1 ones called storage facility and the other called shanty town.
your missing the 5th emblem which is o top of a roof where you send the chick over to the next building to tack car of everyone and unlock the door for you its the area with the broken down and roofless nus with two granads in it and where the chainsaw guy comes at you.......... the building is the build ing you first come into after sava snipers guys from a small build or hut with a broken ladder ..........go into the building and all the way up to the 3rd floor look up between the gap of the roof where it looks like it colapsed and where you tose sava over to the other building and you can barley see it but its directly above you.......... your welcome showing you where the 5th baas emblem is .......... do i get something foor it maybe a caption with my name lol email me for more direct details @ [email protected] and i will tell you were the other 4 emblems are that are not on this guide, Thank You-JIMMY CHANCELLOR!!!!!!!!!!