The Mission
Little Big Planet Walkthrough and Guide
Little Big Planet Guide - Metal Gear Solid DLC
Act 3: The Mission
.-------------------------.----------------------------------------------------.
|# Prize Bubbles In Level:| 23                                                 |
|Complete Level Once:     | Solid Eye                                          |
|                         | Circular Vent                                      |
|                         | Old Snake Head                                     |
|100% Completion Prize:   | Foxhound Patch                                     |
|                         | Pixel Crate                                        |
|                         | Black Wolf                                         |
|Ace Level Prize:         |                                                    |
|==============================================================================|
|PRIZE BUBBLE PICKUPS IN LEVEL:                                                |
|------------------------------------------------------------------------------|
|1. [] Middle Eastern Tiles   2. [] Blue Wolf        3. [] Static Sentry Turret|
|4. [] Searchlight            5. [] Damage Crack 2   6. [] Short Armour Plate  |
|7. [] Laser Sight            8. [] Bullet Holes     9. [] Practice Target     |
|10.[] Sack Cannon           11. [] Middle Eastern  12. [] Explosion           |
|                                   Lattice                                    |
|13.[] Young Snake Leg       14. [] Interlocking    15. [] Camouflage 3        |
|                                   Armour Plate                               |
|16.[] Green Frog            17. [] Sentry Turret   18. [] Stryker             |
|19.[] MGS4 'The Hunter'     20. [] Damage Crack 1  21. [] Wall Damage         |
|22.[] Embossed Cardboard    23. [] Middle Eastern                             |
|                                   Render                                     |
'------------------------------------------------------------------------------'
A mysterious level spammer has risen. This peculiar figure seems to have the ability to create the same level over and over again, and does so 24 hours a day. You, Sack, must stop him at once!
Make your way past Otacon and past the checkpoint. In the next bit you'll have to move to the background in order to not be seen by the searchlight. If you get seen, a Plasma Turret will rapidly start firing Plasma Balls at you, so you'll want to take cover. The second backplane you'll need to jump in. If you don't get found by the searchlight you will be able to find the [#8: BULLET HOLES] and [#16: GREEN FROG] stickers in the last alcove. If you did get found you'll have to restart the level to open up the small gate that has jammed shut when you sounded the alarm. Proceed to the next area of the level.
Pass the checkpoint and avoid the searchlight in the next street. Be sure to grab the prize bubble with the [#10: DAMAGE CRACK 1] sticker. Carefully climb the nearby crates and grab the [#2: BLUE WOLF] prize bubble without being seen by a second searchlight in the background, and also flip the switch quickly.
This is a tricky part, because the searchlight moves fast. Wait for it to move left and while it's still moving, quickly jump over from the crate to the switch, flip it, and immediately drop down. You should have enough time to do this without getting seen.
The door will be opened, and if you didn't get seen your reward lies in the open gate that holds two prize bubbles with an object and a decoration:
[#4: SEARCHLIGHT] and [#14: INTERLOCKING ARMOUR PLATE]. Continue your way and grab the paintinator. Use it to blast two turrets on the right.
 Don't forget to shoot the score bubble container above you. |
When you've done so, grab the [#3: STATIC SENTRY TURRET] from the alcove. Move to the other alcove closer to the third turret and destroy it. You can also shoot the two objects on the upper left and upper right of the turrets to grab some score bubbles.
The next area has two turrets, one on the ground and one on the ceiling. Take out the ground turret first by switching between shooting and hiding in the backgrounds. When both turrets have been destroyed, grab the prize bubble from the middle alley which holds [#17: STATIC TURRET]. Before you go over the crane (which is actually a Sack Cannon), be sure to grab the two prize bubbles on ground level located on the right. These hold [#1: MIDDLE EASTERN TILES] and [#10: SACK CANNON].
When the Sack Cannon is at its lowest angle, launch yourself against a wall where you'll find the [#22: EMBOSSED CARDBOARD].
Hop onto the Sack Cannon and launch yourself to the next area, which is even more dangerous than the last. Grab the paintinator and destroy the Plasma Shooting turrets from the ceiling by blasting their two creature brains. Move on and shoot another ground turret. Hop over the gap and destroy one last ceiling turret.
Before dropping down, shoot the green blocks attached to the walls which will activate steps for you to slowly descend. This the preferred and only method, because the floor looks awfully hot. Before you move to quickly through these steps, flip the second green block switch on the left wall. Jump and keep pressing to the left in order to find three concealed prize bubbles:
 Check your left for a secret stash of Prize Bubbles. |
[#9: PRACTICE TARGET], [#11: MIDDLE EASTERN LATTICE] and [#12: EXPLOSION].
Continue where you came from.
When you reach the top, try and blast a riding turret in the distance, then drop flat down to grab several prize bubbles and a prize bubble: [#21: WALL DAMAGE]. Continue down the street and look in the alley for a prize bubble with a new material: [#23: MIDDLE EASTERN RENDER]. Also destroy a second turret here. The other alcove holds another prize bubble, this time with an object: [#18: STRYKER].
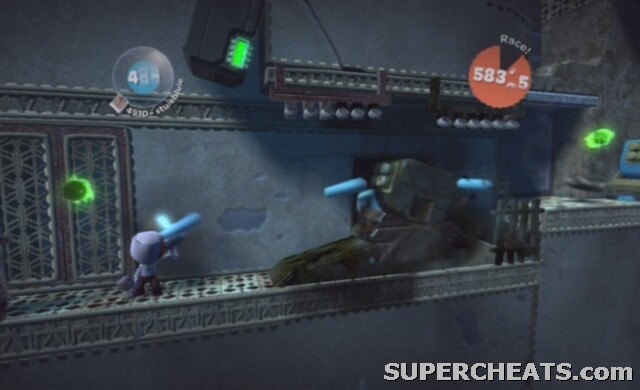
Continue to the next area and meet a devious foe. This tank does not only have a spiked, bulldozer-like ramming plate but also shoots double plasma balls at you. Use the background to hide and fire bursts of your paintinator in order to destroy it. But wait, it's not over yet! With the turret destroyed, the tank enters a second phase and starts dropping small bombs. Keep your firing rate up and dispose of it for good. The explosion causes the nearby walls to blow up completely, leaving for you a load of score and prize bubbles: [#5 DAMAGE CRACK 2], [#6: SHORT ARMOUR PLATE], [#7: LASER SIGHT], [#13: YOUNG SNAKE LEG], [#15: CAMOUFLAGE 3], [#19: MGS4 ‘THE HUNTER].
| It's not as tough as it looks due to its weak armor. |
LBP PS3 stuff
Thank you. I really needed #9,11,12 and never would have found withoout this guide. THANKS!!!!
If you get behind the final tank, you can take out the bottom section first and the whole thing will blow u, no need to shoot the top.