Ryan Amusements
BioShock 2 Walkthrough and Guide
Ryan Amusements
Goal: Get a Ticket
Step off of the train and proceed through the door at the north end of the station. Continue up the steps, past the Vita-Chamber, and head through the next door you come to. Through the door, collect the Audio Diary (Eleanor's Progress) on the altar straight ahead before continuing on. In the next area past the Vending Machine, use your Rivet Gun to kill the Splicer atop the overturned clock.
Enter the ticket stand along the west side of the area and continue through the doorway at the other end. There is a Power to the People weapon upgrade station straight down this corridor -- can't miss it. You can enhance your weapons using these upgrade stations, but each station allows for only a single enhancement.
 Use the Power to the People station to upgrade one of your weapons. |
There are 14 Power to the People weapon upgrade stations in all. Each weapon can be upgraded a total of three times. Select the first two upgrades available for a weapon to unlock the third. At this point in the game, the Drill Damage Increase upgrade is a good choice.
Check out the “Power to the People Locations” section of this guide for a complete rundown. Each station is pointed out in the main walkthrough as well, so if you're following this, there's no need to refer to the two sections simultaneously.
After selecting an upgrade, continue past the closed weapon upgrade station, past the Vita-Chamber, and into the Manager's Office at the bottom of the steps. There will be an Audio Diary (The Old Sheepdog) on the table across from you when you reach the bottom of the steps.
Equip the Hack Tool and fire a Hack Dart at the highlighted door control panel through the broken window. Complete both stages by landing the green needle on a green section both times to open the door. The Ticket is on the table at the back of the U-shaped corridor.
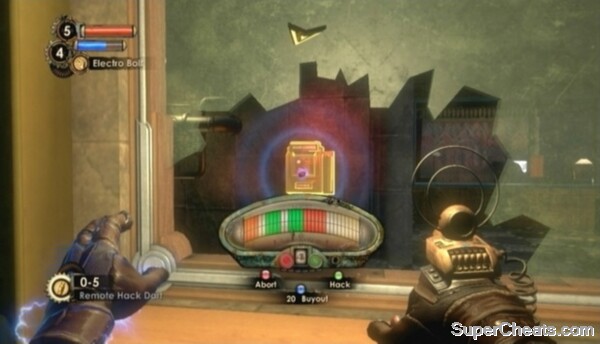 Hack open the door using the Hack Tool and Door Control panel visible through the broken glass. |
Goal: Get into the Park
Make your way back to the Power to the People upgrade station. At the other end of the corridor is a Splicer. Hit her with a couple of Rivets, and then collect the Machine Gun from the breached security inventory. Pick up the .50 Caliber Rounds as well and continue on to the Museum Entrance.
You're up against about a half a dozen Splicers in front of the museum. Use your newly-acquired Machine Gun to make short work of them. You can also use Telekinesis to pick up the explosive barrel by the pillar across from the highlighted Ticket Verification Unit and propel it at the Splicers.
When the area is clear, insert the Ticket in the Ticket Verification Unit and enter Rapture Museum.
Goal: Find a Little Sister in the El Dorado
Pick up the Sports Boost Gene Tonic next to the ceramic statue straight ahead upon entering the museum. Once you have the Tonic, continue into the main area of the museum. Look for an Audio Diary (Volunteer) under the bench on the middle section of the upper walkway.
Make your way to the El Dorado Lounge corridor, which is accessible through the door at the north end of the main hall. Through the door you'll find another gift from Eleanor: the Drill Power Gene Tonic and an Audio Diary (Eat Dog) in a carriage. Once you have collected the tonic and diary, continue to the other end of the corridor and enter the El Dorado Lounge.
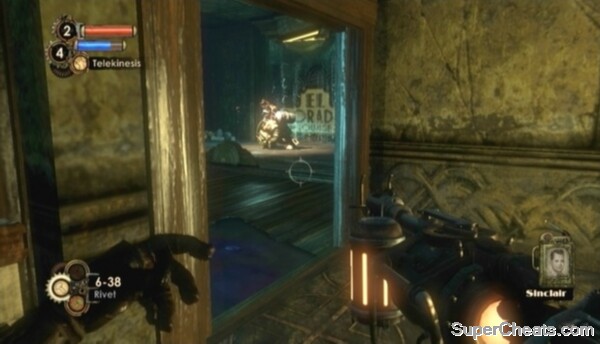 There is Little Sister is in the El Dorado Lounge -- guarded by a Big Daddy of course. |
A Bouncer Big Daddy and the one Little Sister of this level are in the El Dorado Lounge. You must kill the Big Daddy to get at the Little Sister. This is no easy feat -- especially this early in the game. However with a little preparation you can make short work of him.
Goal: Kill the Big Daddy
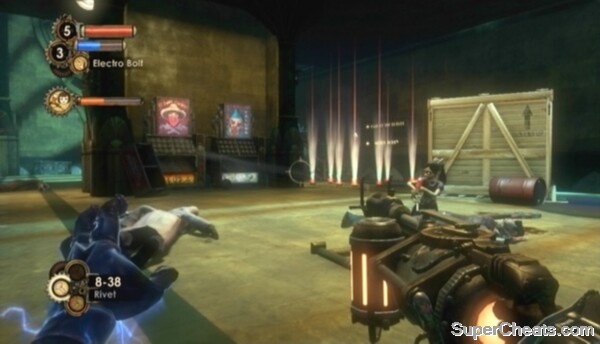
Upon entering the El Dorado Lounge, look for a deactivated Security Drone on the ground. Hack the Security Drone, landing the needle on the blue section of the meter. Look for a Trap Rivet on the bar counter to your right, and collect the .50 Caliber Rounds below the counter further up. The Big Daddy and Little Sister are at the northeast end of El Dorado, but don't provoke the Big Daddy just yet! Hack the Health Station and Vending Machine behind the bar. Then, equip your Rivet Gun with Trap Rivets selected and place as many Trap Rivets as you can in the doorway in front of the large oil spill.
With the Trap Rivets in place, equip your Machine Gun and the Telekinesis Plasmid. Look for an explosive barrel next to the oil spill, pick it up, and propel it at the Big Daddy when he nears the doorway. As soon as you've hit him, start firing your Machine Gun at him. Back up soon after, however, as the Bouncer will likely charge straight for you. With any luck, the charging Bouncer will still be on fire, igniting the oil spill as he moves through the doorway. Continue firing at the Bouncer while backing away.
After the Bouncer sets off the Trap Rivets, hit him with Electric Bolt Plasmid to stun him, then move in with your Drill and further reduce his health. Keep this up until he falls.
Loot the fallen Big Daddy's corpse and then approach the cowering Little Sister. Press the X/Square button to Adopt her when the prompt appears onscreen.
Killing the Big Daddy in El Dorado Lounge
Goal: Gather Adam from 2 Bodies (1 of 2)
With the Little Sister in tow, look for an Audio Diary (“Child” and Guardian) in the open suitcase on the table across from the couch at north end of the El Dorado Lounge.
When you have the diary, hold the X/Square button and a white trail will appear. Follow the trail to reach the first gather spot. Standing on the highlighted Corpse and pressing X/Square will set the adopted Little Sister to gathering. ADAM gathering attracts Splicers, however, so preparing the area beforehand is a must.
Start by hacking the two Vending Machines across from the Corpse. Then, move around to the other side of the column and hack the Health Station there. Purchase as many Trap Rivets as you can from the Ammo Vending Machine. Spread the Trap Rivets on the ground on either side of the two Vending Machines, and place some along the walls on the two sets up steps leading up to the walkway as well. Purchase more Trap Rivets if you have cash to spare.
Once you've prepared the area, set the Little Sister down at the Corpse to begin the Gather. The bar below your own health and EVE in the top-left corner of the screen indicates the Little Sister's progress. Hold off the Splicers until the bar is completely full to complete the Gather.
 Protect the Little Sister while she gathers ADAM. |
Equip your Rivet Gun or Machine Gun and be ready for any Splicers that make it through the Trap Rivets. Take note the nearby oil spill and explosive barrel.
If you want to unlock the “Master Protector” Xbox 360 achievement or PlayStation 3 trophy, worth 15 points or a Bronze trophy, you must not take any damage during a Gather and not allow a single Splicer to interrupt the Little Sister. If you're not interested in unlocking the achievement or trophy, there's no need to go overboard with the Trap Rivets. If you are interested, see the video below.
Unlocking the Master Protector achievement/trophy
After the first Gather, be ready for some Splicers to break through the door behind you. Then, collect the Little Sister and proceed through the doorway.
Goal: Gather Adam from 2 Bodies (2 of 2)
There's a secret achievement/trophy to unlock here. Once through the door, look to your left to spot a robotic Andrew Ryan sitting at the desk there. To unlock the 9-Irony achievement/trophy, pick up the golf club next to the bookcase behind the robotic Ryan's desk with Telekinesis and launch it at the robot's head.
Unlocking the 9-Irony achievement/trophy
Grab the Machine Gun up ahead to collect some ammo, and then continue down the steps to the tracks below. Gun down the four Thuggish Splicers when they come at you and then head to the west end of the room. While facing the “Journey to the Surface” sign, turn left and look for an Audio Diary (You, Me, and 1959) and a Heavy Rivet on the desk there.
Once you have the diary, return to the previous room. Start up the tracks, but be ready to fallback, as the bathysphere at the top of the slope will soon come rolling down. Turn right at the top of the tracks and follow the bridge there to find a Health Station. Further are some Anti-Personnel Rounds for your Machine Gun, which will surely come in handy in the areas ahead.
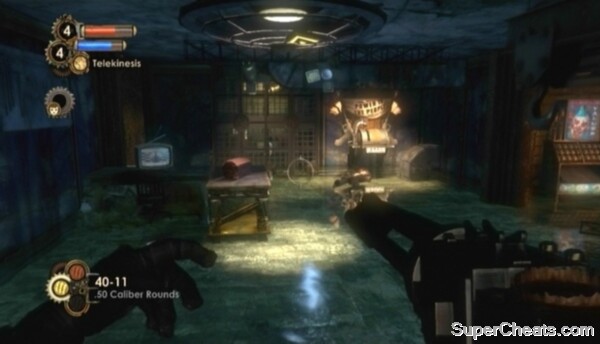
Hold the X/Square button to have the Little Sister guide you to the second Gather spot. There's a Splicer working on a Turret in this room. Equip your Hack Tool, hit the Turret with a Hack Dart and complete the three stages to turn it friendly. Try your best to land the needle on a blue section at the start to give the Turret a damage boost.
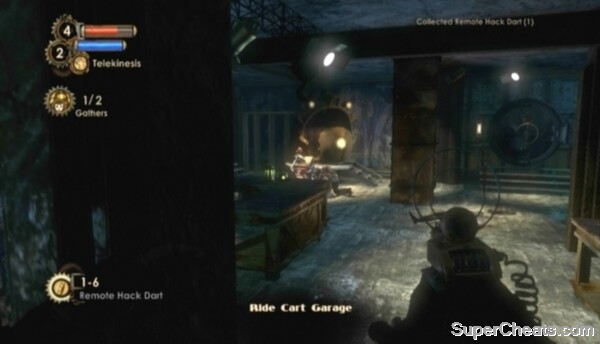 Hack the sparking Turret in the Ride Cart Garage to your side. |
Pick up the Trap Rivets on the table in the middle of the room, and look for an Audio Diary (Escape Plan) on the ground next to the Corpse. Then, look for a Health Station along the east wall of the room and hack it. Hacked Health Stations release a noxious gas when enemies attempt to use them to heal.
Hack the Ammo Vending Machine by the Vita-Chamber in the southwest corner of the room and spend your money on Trap Rivets. Place at least five Trap Rivets along each of the windows, as Leadhead Splicers tend to take cover there to fire at you. Most of the Splicers are going to break through from the door at the northwest end of the room, so set your remaining Trap Rivets in that area leading up to the Corpse.
When you're prepared, set the Little Sister down at the Corpse and hang back by the Vita-Chamber. Equip your Rivet Gun and watch as your traps dismantle the incoming Splicers. Keep an eye on the doorway at the northwest end of the room, as some of the Sluggish Splicers may make it through the Trap Rivets. Hit them with your Rivet Gun or your Machine Gun with Anti-Personnel Ammo selected. Don't hesitate to use your Drill if they get really close.
Ride Cart Garage Gather Spot
Hold off the Splicers until the Little Sister is finished gathering, then pick her up to complete the current goal. Collect the ammo in the Lockboxes strewn about the room before continuing on.
Goal: Get to the Sister Vent
Exit the room through the doorway closest to the Health Station and turn left. Look for an Audio Diary (Lamb the Problem, Sinclair the Solution) and .50 Caliber Rounds on the table behind the falling water.
Continue following the arrow at the top of the screen down the tracks and keep an eye on your right. When you pass the white “We Will Be Reborn” graffiti, head through the opening in the wall further up. Climb the steps up to a balcony and collect the Trap Rivet and Heavy Rivet there. There is an Audio Diary (Truth is in the Body) on the table around the corner here. Continue to the very end of the walkway to find two things of Anti-Personnel ammo for your Machine Gun.
Return to the tracks and continue following the arrow at the top of the screen. The arrow will soon lead you to the Sister Vent. You're faced with a choice: Rescue the Little Sister by pressing the X/Square button at the Vent, gaining 80 ADAM, or Harvest the Little Sister by pressing the Y/Triangle button, gaining 160 ADAM.
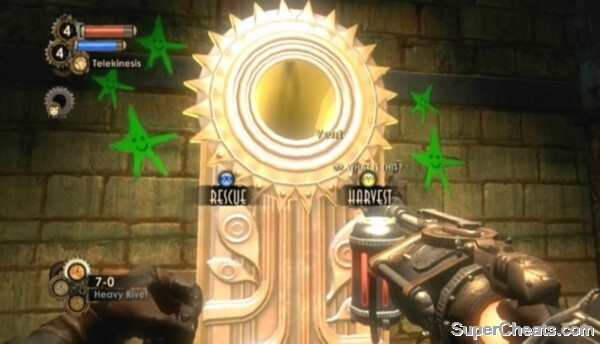 Rescue or Harvest the Little Sister at the Sister Vent. |
It's important that you understand the benefits of rescuing the Little Sisters before going ahead and harvesting for the added ADAM. Rescuing the Little Sisters yields additional ADAM found in gifts. There are three gifts total, each earned by rescuing a certain number of Little Sisters. These gifts contain a sizeable chunk of ADAM, and there are two Gene Tonics only obtainable by rescuing the Little Sisters (the Proud Parent Tonic is one of them, which increases the amount of ADAM a Little Sister can gather at a gathering spot by 20). As well, to unlock the “Savior” Xbox 360 achievement or PlayStation 3 trophy, worth 25 gamerpoints or a Silver trophy, you must rescue each and every Little Sister, as well as spare all three of the characters you are given the choice to let live or die.
If this is your first time through and you're not playing on the Hard difficulty level, it's probably best to Rescue the Little Sisters to gain these perks.
Goal: Buy the Incinerate! Plasmid at the Hall of the Future
Start back toward the tracks. You'll face a group of Splicers on your way there, so be ready with your Machine Gun and Anti-Personnel Rounds.
Continue down the tracks until you reach rubble blocking your path. Move through the doorway to the right of the robotic family sitting on the couch to enter a room with two large hands. Use the Y/Triangle button to jump onto the palm of the hand to the right and walk up the arm to reach the platform above. Look for an Audio Diary (Deterioration) next to a Corpse here. Continue along the walkway to find Anti-Personnel Rounds for your Machine Gun.
When you have the first diary, drop down and enter the Ride Maintenance area through the automatic door to the left of the robotic family sitting on the couch. Use the Power to the People Station straight ahead to upgrade one of your weapons. Look for an Audio Diary (Helping Sinclair) near the Vending Machine in the alcove to the right of the weapon upgrade station. There's a Safe and some ammo in the room to the left of the Power to the People station. Use the Bot Shutdown Panel in this room if you land the needle in a section of the meter while attempting to hack the Safe.
 Upgrade one of your weapons using the Power to the People station in Lighting Storage. |
Exit through the automatic door next to the Safe. Kill the Splicers you encounter further down the tracks and either hack or destroy the Security Camera in your path. Enter the area below the Security Camera and melee the boards there to uncover a secret area. There is an Audio Diary (Doctor Lamb) on the mattress here.
Continue to the end of the track where you must turn left through a doorway marked “Ride Maintenance.” Collect the Audio Diary (Efficacy) in the overturned filing cabinet through this doorway. Continue to the end of the corridor and interact with the Maintenance Door Access switch to open all doors. Move through the door that opens to return to the ride entrance. Here you will face a handful of Leadhead Splicers and a couple of Thuggish Splicers. Be ready with your Rivet Gun or Machine Gun. Duck back through the door you just came through if you're taking damage.
There's an Audio Diary (Dating Plans) and a Gene Tonic to collect before moving on, now that you've opened the doors. Head back down the ramp leading to the Journey to the Surface ride entrance. Go through the now-open doorway in the northeast corner of this room. Collect the Booze Hound Gene Tonic here and then look in the backroom to find the diary.
 Collect the Booze Hound Tonic after opening the doors. |
After collecting the audio diary and Gene Tonic, make your way back to the museum lobby and onto the upper walkway. Follow the arrow at the top of the screen to the “Hall of the Future” entrance. Move down the corridor and to the steps leading up to the next room. Look for a Hack Dart on the steps, and then move up just enough to trigger the automatic door. There are two Splicers are arguing over a malfunctioning Turret in this room. You know what to do. Hit the Turret with a Hack Dart and complete all three stages to turn it friendly, then just sit back and watch as the Turret demolishes the two Splicers.
Continue through the door at the other end of this room and then down the U-shaped corridor. Look for an Audio Diary (A Father's Love) by the Vita-Chamber in the next area. Past the Vita-Chamber is a Gatherer's Garden. From it, you can purchase the Incinerate Plasmid. A Health Upgrade and Eve Link Gene Tonic are also available. You should have enough ADAM to purchase them all. Consider purchasing the Health Upgrade too.
Goal: Thaw the Frozen Door
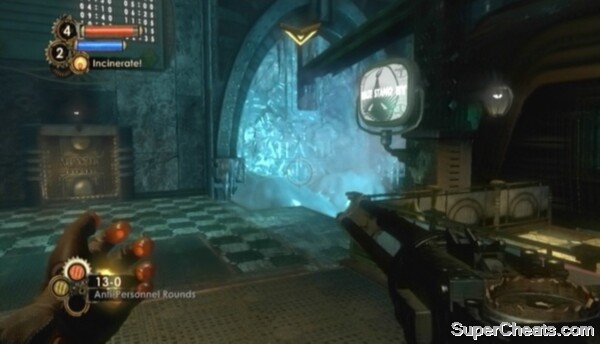
Make your way back to the start of the U-shaped corridor and use Incinerate to melt the ice covering the doorway there. There's another Gatherer's Garden here, with some additional upgrades available. Use Incinerate to melt the mound of ice in the kitchen to collect the embedded Trap and Heavy Rivets, and then start back toward the Hall of the Future entrance. You'll be facing a Big Sister in the lobby (surprise surprise), so buy a couple of First Aid Kits from the Vending Machine by the entrance before proceeding through.
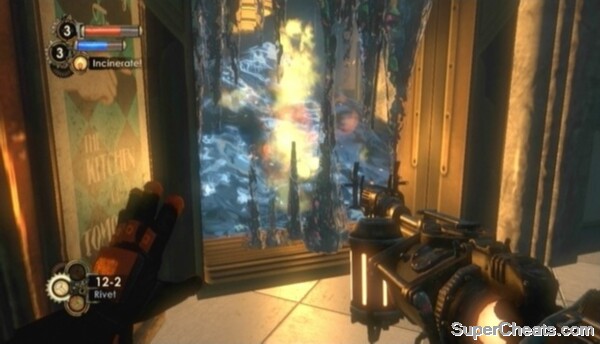 Melt ice mounds with incinerate. |
As soon as you spot the Big Sister, continuously hit her with Rivets until she jumps back to the far end of the bridge. Then, immediately use Telekinesis to pick up the explosive barrel next to the oil spill further up and to your right. Propel the explosive barrel at the Big Sister while she's at the other end of the bridge to set fire to her. It's important that you get this explosive barrel out of the way right at the start; if you aren't quick on the draw, Big Sister may pick up the explosive barrel with her own Telekinesis power and use it against you.
Telekinesis is your best friend here, so don't bother switching too any other Plasmid for the duration of this fight. You could use Incinerate to set fire to the Big Sister while she's standing on the oil spill, but doing so is not worth the effort.
The Rivet Gun with Trap and Heavy Rivet ammo deal a nice amount of damage. Hit her with Heavy Rivets when she's actually standing still. For the Trap Rivets, just sprinkle them around her (or attach them directly onto her) and she will most likely trip them as she jumps about.
The key to surviving this fight is to keep moving. Never stand on the spot unless the Big Sister is using Telekinesis. The large rocks Big Sister picks up with Telekinesis deal a good chunk of damage when propelled at her, so use them to your advantage. When you see Big Sister gathering nearby objects with Telekinesis, stand on the spot and wait for her to propel them your way. As soon as she releases them, use Telekinesis to grab the object that would have hit you -- most likely a large rock -- and shoot it back at her. Even while she's not using Telekinesis, rocks will be strewn about the walkway, so make use of them.
Defeating the Big Sister in the Rapture Museum
When the Big Sister falls, loot her corpse to find 40 ADAM. Before making your way back to the station to thaw the frozen door, enter the Gift Shop at the east end of the bridge. There are a couple of audio diaries to collect in this area. The first Audio Diary (Cutting Corners) is in an open box behind the counter at the south end of the room. To find the second Audio Diary (Rapture in Deliverance), start by heading down the steps across from the Ammo Vending Machine. At the bottom of the steps, turn left and use Electro Bolt on the Door Control to open the gate. The diary is on a table at the back of the “Dames” room. Collect the Heavy rivets on the mattress before leaving.
After collecting the two diaries, return to the station by following the arrow at the top of the screen. When you reach the Vending Machine at the start of the Museum Entrance area, use Incinerate to melt the giant mound of ice next to it. Collect the ammo and Audio Diary (Disappeared) that were embedded in the ice, and then continue to the station.
 You can thaw the frozen door in the Train Station now that you have Incinerate. |
Back at the station, use Incinerate to melt the mounds of ice in front of the frozen door. Then, enter the security booth across from the train and use the highlighted Security Override Switch to trigger an event.
Sophia Lamb is sending more Splicers your way. Unfortunately, if you're after all the collectibles, there's one last Audio Diary (Wooden Nickels) to grab before you can hop on the train and escape. It's easy to miss. Leave the security booth and look in the room to the left of the now-unfrozen door to find the diary. With that, shoot your way to the train, get in, and flip the switch to travel to the next level.
Collecting the Wooden Nickels Audio Diary
this guide is good but only if they had the hard walkthru with better tips., cuz hard is really hard compared to easy. i died at least 10 times.