Underflow
Thank you for printing this page from www.SuperCheats.com.
Remember to come back to check for updates to this guide and much more content for Bravely Default
Follow this guide to hear about updates
Last Updated:
Make your way to the mine. Before reaching the entrance, you'll find Egil being chased by some enemies. Defeat them and Egil will tag along. After the battle, a new party chat will be available. (Airy vs Egil) Enter the mine. After getting inside, another party chat will be available. (Egil's Words) Head to B2 and go straight to the north. Approach the door for a scene. Once Egil opens the door, head to the next area.
1F East
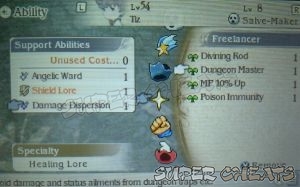
You have to be careful of the occassional lava traps on the ground. You can have someone in your party to temporarily equip the Freelancer Dungeon Master support ability to avoid getting damaged by these and to make your progress a lot faster. Deliberately step to one to unlock a new party chat. (Don't Get Burned)
Head to the far left and when you see a split, go south to find a chest containing 1000pg. Continue north until you reach another split. Head to the far right first until you reach another chest that has a Bomb Arm inside. Return to the split in the middle north and go down to find another split. The path leading to the southwest has a Bomb Fragment inside and the path to the southeast leads to another locked blue chest. Make your way to the northwest to find the stairs to the next floor.

2F East
Once you encounter a split, go south and find the chest to the southeast containing 2000pg. Backtrack to the main path and continue all the way to the west. Go south to find a Safety Ring from the chest. Return to the main path and take the adjacent path south. On the way to the stairs to the next floor, the party will take a break and a scene will ensue.

3F
Head straight north but when the chest is almost at your reach, a part of the ground will be swallowed up by lava. While exploring the area, Egil will get tired again and you'll have a short rest. Once done, collect all the three chests in the area. The southern chest contains an X-Potion, the middle one has a Flame Charm while the chest to the northeast has a Turbo Ether. Use the stairs in the northwest corner to reach the next floor.

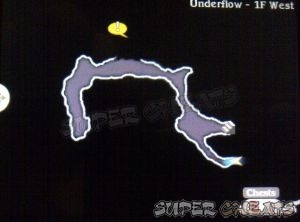
2F West
Like before, some of the paths in this floor will sink to the lava and you'll have to find a way around. This is a rather large map with long streches of lava traps so tread carefully if you don't have the Dungeon Master ability. The chest to the southeast has a Diamond Staff, the chest northwest of it has a Flare Hatchet and the chest to the northwest has a Gale Bow. After collecting the weapons, find the stairs to the southwest and head to the next floor.

1F West
Head to the left for a scene. The earthquake will clear up the boulders you've encountered before and open up a shortcut to the southeast leading back to the Mythril Mine entrance. Go there first and save your game. Return to Underflow 1F West then head north to reach the Temple of Fire.

Anything missing from this guide?
ASK A QUESTION for Bravely Default
Comments for Underflow
Add a comment
Please log in above or sign up for free to post commentsNo comments yet. Tell us what you think to be the first.
Table of ContentsClose
- Basics
- Asterisks / Job Classes
- Jobs Guide
- Extras
- Intro
- Chapter 1
- Chapter 2
- Chapter 3
- Chapter 4
- Chapter 5
- Chapter 6
- Chapter 7
- Chapter 8
- The End
- Sub-Scenarios (Ch1)
- Sub-Scenarios (Ch2)
- Sub-Scenarios (Ch3)
- Sub-Scenarios (Ch4)
- Sub-Scenarios (Ch5)
- Sub-Scenarios (Ch6)
- Sub-Scenarios (Ch7)
- Sub-Scenarios (Ch8)
Guide Updates
Get notified of updates to this guide
Many of our guides get updated with additional information. To get an email when this guide is updated click below.
 Join us on Discord
Click to close